Winterizing Your RV

So You Want To Winterize?

  1. Drain water completely by opening all faucets, floor drains and drain cocks on fresh water tank and hot water tank.  Using low pressure (40-50 psi) compressed air hooked-up to your city water connection can speed up this process.
  2. Bypass hot water tank by disconnecting hot and cold water lines from it and connect the lines together by means of the appropriate bypass kit. Make sure all connections are tight. To make things easier, install an appropriate water heater bypass kit.
  3. Remove water line from between water pump and fresh water tank. Connect a long enough piece of proper size water line to the pump with the other end placed in a gallon of Virgin Propylene Glycol non-toxic Antifreeze (as a permanent and convenient option, install an antifreeze ‘pick-up kit’) . An alternative, just pour antifreeze into fresh water tank and pump it through your water system (this method will require more antifreeze).
  4. Close all faucets and floor drains and place bypass valves in the winterizing position if you have one.
  5. Start Water pump. If an air lock prevents pump from siphoning antifreeze, open a floor drain until antifreeze is “picked up” by pump.
  6. Starting with the closest cold water tap to pump, open until antifreeze appears. Close tap. Continue to next cold water tap and repeat until each cold water outlet emits antifreeze. Now do each hot water tap and outlet. Don’t forget the shower head.
  7. Flush the toilet until antifreeze appears. Allow a pint or so to go into your holding tank. Leave about a ½” of antifreeze laying on the toilet trap. It’s a good lubricant for the seals.
  8. Disconnect the check valve from the pressure water intake to ensure there is no water laying in the check valve or water entrance cap.
  9. Reconnect the check valve and the water lines to the hot water tank and allow a small amount of antifreeze to run through the hot water tank.  Or switch your water heater bypass into the flow through position and allow a small amount of antifreeze to run through the water heater.
  10. Check underneath your RV along the entire water system to see if there are any drain cocks below the water lines. If so, open each one until antifreeze begins to flow.
  11. Turn off the water pump. Reconnect water line from fresh water tank to pump or disengage your ‘pick-up kit’. Pour a quantity of antifreeze into your fresh water tank for the winter. Open all faucets and floor drains to allow excess antifreeze to run off. Collect this run-off and pour down each of the sink and tub traps. Be sure to use enough. Leave All Faucets, drain cocks and floor drains open for the winter.
  12. Now is a good time to inspect your roof for any repairs or resealing that may be required.

Hope this has been of some help to you. Have a good winter. See you Next Season.

Rubber Roof Maintenance

Keep Your Roof Clean and Sealed

One of the best and most important pieces of advise we can give you in maintaining your RV is to clean and inspect your roof!  It doesn’t matter the type of roof they all need to be cleaned, inspected and maintain.  We recommend that you do this a minimum of twice a year for a few reasons.  One being it is a perfect opportunity to inspect your roof.  It is very important that you regularly check the condition of the roof and it’s components to make sure there are no tears, holes or cracks in the roof, or any missing/damaged vents lids or caps.  This will help prevent your roof from damaging leaks. Most RV’ers end up, at some point, under trees while camping. Tree sap and leaves should not to be left on your roof  for  long period of time they not only cause quite a mess on roof they can cause damaging mould.  It is always our advise to not get onto your roof rather use a good ladder and inspect and clean your roof from the sides.

Maintaining Your EPDM/TPO Roof

How to maintain a roof  is one of the most asked questions at our shop.  There are several different types of roofs but the most popular right now is EPDM/TPO  and fiberglass roofs.  EPDM/TPO roofs are often called by a more generic name “rubber roof”.  Rubber roofs are a very thin membrane that is glued to the plywood under your roof.  They are very easily damaged  by not using the correct products on them. Regardless of where you buy your cleaning, treatment and caulking from always make sure the product specifically says on it that it can be used on a EPDM/TPO roofs.  Never use household cleaners , abrasive cleaners or any product that contains petroleum distillates and never use scented cleaners unless approved for EPDM/TPO roofs.  They are very damaging to your roof and will shorten their life.

Roof Cleaning and Products We Recommend:

  • Dicor Roof Cleaner
  • Mirage

protectall guy on roof

Keeping Your Roof Like New:

Although most EPDM rubber roofs come with a warranty, you can dramatically increase the life span of your roof with a little seasonal maintenance!!

Re-sealing and Repairing Your Rubber Roof:

One of the benefits of cleaning your roof 4 times a year is that it guarantees that you will be on your roof really examining it for damage and deterioration.  It is important to look for cracked and pealed caulking around your roof vents and the side moldings.  If you see any sign of this you need to reseal with an EPDM friendly sealant.  We use Dicor’s own Lap sealant.

dicor group1

Also, check your roof for small tears in the roof fabric.  These types of tears are most commonly causes by tree branches rubbing on the roof while backing into or pulling out of a campsite.   Depending on the size of the tear, you may be able to caulk it with the Dicor Lap Sealant, this may work for a very small tear or hole.  For larger tears, you may need to try a patch kit.  These kits contain a small piece of peal and stick EPDM roofing and a tube of Lap Sealant.  For very long tears you can purchase long strips of EPDM roofing and an EPDM friendly water based adhesive

This may seem a little strange, but trust us, we see it many times a season…DO NOT PUT DUCK TAPE ON YOUR RUBBER ROOF!!  Duct tape tends to be very difficult to remove from a rubber roof without making your tear even longer.  Furthermore, the adhesive in duct tape tends to have petroleum distillates, a BIG NO for rubber roofs.  Petroleum distillates will actually eat the rubber on your roof, this is why it is so important to use products specifically designed for rubber roofs.  If you are unsure if a product is okay please ask us we are always willing to help.


Metal Roof Maintenance

Steps to Maintaining Your Metal Roof:

  1. You should look at your roof at least twice a year, in the spring and in the fall.  Check all seams, around the sides and around all other objects on your roof (vents, plumbing stacks, antennas, etc).
    • If the roof coating is peeling, flaking or cracking, then it is time to re-do that area
    • If you find any punctures (from falling debris) your roof will require some repair
  2. Prepare your roof for coating the same way you’d prepare your walls for paint.
    • Prep the surface with a wire brush or scraper, removing as much of the old roof coating as possible, especially the stuff that’s flaking.  This sometimes takes a bit of elbow grease, but the final result is worth it!!
    • Then clean the surface with a product that does not leave behind a residue.  We like Tri Sodium Phosphate (TSP).
  3. Now you’re ready to seal your seams.
    • Some people like to use fiberglass tape with the seam seal (this does an excellent job, but is not essential).
    • We suggest a rubber based product, they will last longer and adjust better to temperature changes.  We use DYCO 20/20.  Spread your seam seal on with a disposable paint brush. Use 2 thin coats, allowing time to dry between applications.
    • If your roof is galvanized steel you may wish to coat the entire surface, to avoid deterioration and pinholes.
  4. Relax and Enjoy!!!


For Those Who Tow…

Many of our customers wonder how to keep themselves safe while towing.  Through this article, we will address some of the key issues associated with taking your RV on the road.

Mirrors:

Towing mirrors are a very important safety feature.  Your mirrors should allow you to safely view your entire RV while towing and parking.  This means you should be able to see both rear corners of your RV using your extension mirrors.  Mirrors come in all price ranges and styles and some extension mirrors now come OEM on new trucks.  If you are not fortunate enough to have extension mirrors as standard equipment on your vehicle, we will explain some options available to you.

Clip-On Mirrors:

Clip-on mirrors is often the most economical option available to RVers.  These mirrors attach to your vehicle’s existing mirror using a rubber strap.  They come in different mirror sizes allowing a varied viewing area, depending on the size of your RV.  They are fully adjustable, and often fit vehicles that do not have the option of other types of tow mirrors (ie. slide on tow mirrors).  However, sometimes these mirrors do not fit vehicles ideally and they also tend to vibrate while driving, making visibility poor sometimes.

Slide on Tow Mirrors:

This type of mirror is custom designed to fit your tow vehicle.  They are a plastic molded mirror that slides over your existing mirror and fastens with a plastic wedge or hook.  They are a sleeker looking mirror than the clip on style and tend to vibrate less. However, they are not available to fit all vehicles, especially less traditional tow vehicles (ie. cars). Also, they often offer a smaller overall mirror than other tow mirrors on the market.
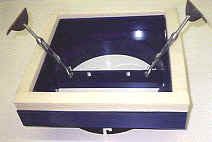
Door Mount Mirrors:

Although these mirrors are more expensive than the two styles listed above, they offer some wonderful features that the other two types do not. We advise these mirrors for any serious RVer.  These mirrors mount under your vehicle’s door and in your window well.  They have a very large mirror face that is fully adjustable on a shaft that offers true extension.  These mirrors do not require holes or drilling and set-up easily after your initial installation.  Most importantly they do not vibrate.

There are many other mirror styles on the market.  Available in manual or electric, some extension mirrors even replace your existing vehicle mirror.  Please contact us if your have any questions or comments about tow mirrors.

Your Bearings On Your Towable RV:

Throughout this season, we have assisted with some serious bearing and brake issues that could have been easily avoided.  There are a couple main culprits to these bearing disasters.

Bearing Buddies, Easy-Lube Axles & Over Greasing: The first problem is bearing buddies and easy-lube axles.  These products allow you to add grease to your bearings by injecting it into a grease nipple that often replaces your hub cover.  These products were designed for the marine industry for use on boat trailers and are not appropriate for RV’s.  When you inject grease onto your bearing the extra grease has nowhere to go.  When the grease heats up during travel it leaks onto your trailer brakes often damaging them beyond repair.  The second problem is similar to the first, over greasing. Over greasing is just that, using too much grease when repacking your bearings.  Like easy-lube axles and bearing buddies the results are the same, the excess grease can causes damage to your brakes.  This can often result in brake loss and costly repairs.

Repacking Your Bearings:

According to Dexter Axle your bearings need to be repacked once a year or every 12, 000 miles, which ever comes first.  If you choose to do this yourself, you should be careful not to over grease and to always use the correct fresh seals (we stock a large number of brake parts, including seals, magnets, springs and shoes).  If you are not comfortable doing this work yourself, we would gladly do it for you. This bit of maintenance can save you time and money in the long haul.

Sway Controls and Weight Equalizing Hitches:

This section applies to those who are towing travel trailers. To clarify, we would like to explain the difference between a weight equalizing hitch and a sway control.  These often causes a lot of confusion among customers. Except in unique circumstances the arms on your weight equalizing hitch do not act as a sway control.  These arms help to distribute the weight of your travel trailer across the frame, so that all weight is not carried on the back of your vehicle but rather transferred across all axles. If you connect your travel trailer and the back of your vehicle drops significantly you should look into a weight equalizing hitch.

A sway control on the other hand, reduces sway while driving.  Most people who tow find the existence of sway extremely uncomfortable and in some circumstances it can become dangerous.  The general rule is trailers over 24’ require one sway control and those over 29’ require two.  However some exception apply.  Ask us for more information

Buyer Beware:

When choosing a weight equalizing hitch please note that the equalizing arms come in different weights (usually from 350lbs to 1200lbs).  Although all of these hitches usually cost the same amount, please remember bigger does not necessarily mean better.  These weights are optimized for the specification of your trailer.  For example using heavier rated arms on your lightweight travel trailer can cause your trailer to skip across the road as you pull it (shaking up all your stuff and causing increased sway).  This will make your vehicle harder to control while towing and put a tremendous amount of strain on the trailer itself.  Conversely, if you chose to use lighter weighted arms on your heavy trailer you will not get the full benefits of an equalizer hitch.  Let us help you choose the hitch necessary for your towing situation.


If you have any further questions about towing and towing safety feel free to message or call us.

The RVer’s Toolbox

Your RV is a house on wheels and like any house you should have a basic toolbox inside.  Your RV toolbox does not need to be complicated, but it should have some items to help you fix those pesky little problems when they arise. Aside from the usual multi-bit screwdriver, wrenches, hammer, pliers, nuts, bolts and nails your toolbox should include a few items that are specific to the unique needs of an RVer.

People_Picnic

Just in Case Items:

  • A pair of work gloves
  • A multimeter – This device will help you measure electrical current in an electrical circuit or between two points.
  • Tire pressure gague
  • Bungee cords of various lengths
  • Rope
  • Duct tape – A must for emergency sidewall patches, some awning repairs and other make do repairs that might arise on the open road.
  • Electrical tape and plumbers Teflon tape
  • Flashlight
  • 12V light bulbs – When choosing a selection of light bulbs do not forget to check the bulbs used in your refrigerator, tail and clearance lights and interior lights.
  • Assortment of 12V Connectors – You should include mar connectors and some blue butt connectors.
  • Small first aid kit – this should include Band-Aids, alcohol wipes, antibiotic ointment, gauze, first aid tape, cotton swabs, sun screen, after burn cream, and after bite ointment, scissors, tensor bandages, Tylenol, safety pins etc.
  • Batteries – Check your smoke and LP detector, air conditioner remote and other battery operated items and include a selection of batteries to suit your needs.
  • Fuses – Don’t forget to check what fuses are used in your RV and include an assortment of these in your toolbox.  Importantly, don’t forget to check your slide-out – there is nothing worse than a slide-out stuck in the out position because of a simple blown fuse.
  • Roadside safety kit – Importantly this kit should include collapsible pylons and flares to protect you and your rig in case of an emergency roadside side stop.
  • Nylon ties or zip ties – Strong and versatile, these simple items can perform some pretty important tasks.  From securing your awning arms while traveling, to tying up a broken scissor jack or fastening a wayward wire these should certainly be a part of every RVers toolbox.

Products for all RVers:

  • Garden hose washers
  • Barbeque lighter and butane
  • Bubble fridge level
  • 3/8” flare plug – This will give you the ability to disconnect a malfunctioning or leaking propane appliance safely while still having the use of your other propane appliances.  Please remember that in Ontario any work that disrupts the integrity of your LP gas system must be inspected and tagged by a licensed LP gas professional before the gas system is put into operation.
  • Some RV adaptor plugs – Depending on your own electrical service and where you are going to be camping it is wise to have the necessary electrical adaptors.  These might include some of the following – a 15A-30A adaptor, 30A-15A adaptor, 30A-50A adaptor, 50A-30A adaptor.
  • Waterheater drain plug – The loss of hot water for a weekend because of a simple broken drain plug can easily be avoided with a spare plug in your toolbox.
  • Disposable latex gloves – A must have for those dirty plumbing jobs.
  • Top Tape awning repair tape – It is a clear tape that allows you to repairs tears and holes in your awning fabric.
  • Eternabond leak repair tape  – This product is absolutely incredible.  It is sold by the foot and a small amount will work to patch black and grey water tanks, metal and rubber roofs and most likely anything else you can think of.  This product is actually just a thin layer of butyl tape backed on a thin piece of aluminum, fabric mesh or white UV stabilized backing.   Peal off the protective backing and permanently fix all kinds of leaks.
  • Non-dirt attracting spray lubricant – We like Protectall’s Slide-Out Dry Lube.  This product will help you to avoid the temptation to use a dirt attracting lubricant on your jacks, slide-out, electric step and other items that might give you some trouble when out on the open road.
  • Dicor Lap Sealant – For all you with a rubber roof this is the only product you can use to patch tears and seal seams.  Carrying this with you at all times will help you avoid the temptation to patch your rubber roof with products that are incompatible with your rubber roof (i.e., many other caulkings and sealants on the market).  Please note these incompatible products do include duct tape!
  • ProFlexRv– This polybutene based sealant in a tube is wonderful for any emergency caulking job (except on a rubber roof).  It fits easily into your toolbox and works very well on both fiberglass and aluminum.
  • Special RV screwdriver – If you’ve ever tried to take down your cupboards in your RV, you may have notice that many RV manufactures use a strange screw that looks like a number 8 turned on its side.  You can purchase at your local RV shop a multi-bit screwdriver that has this bit or you can purchase the bit on its own.
  • Putty tape – This product is used to create a protective weatherproof gasket on almost everything installed on the sidewall of your RV.  It should be used behind all metal moldings, windows, lights, doorstops, cable hatches etc.  Do not use putty tape on your rubber roof!

Products For Towables:

  • Wheel bearing kit – There is only one thing worse than blowing a bearing on your travels – that is waiting days while the RV shop or automotive repair facility orders in your bearings.  Carrying a spare inner and outer bearing, axle seal and a small tube of grease will make sure you lose no time when hit with the unexpected.
  • LP bottle wrench – Only those with the old style propane tanks will require this wrench  (i.e, these tanks do not have the newer style plastic nut that allows you to connect and disconnect by hand) This wrench will allow you to easily disconnect your propane tanks and get them filled.
  • Extra hitch pins and clips

Products For Motorhomes:

  • LP Valve Seal – This seal costs no more than 2 dollars and if it is leaking or missing your propane filler cannot fill your tank.  You only have to encounter this once to learn your lesson (spoken from experience).


Purge Please

This week at our service shop we ran into an interesting problem. We are sharing this with you in the hopes that none of you will have to deal with this problem yourself.

After installing an under-slung propane tank and a furnace in a cube van, we instructed the customer to go down the street to the very reputable propane filler to have his tank “purged and filled”. Unfortunately the filler was on the road and wouldn’t be in until early the next day. In a panic, the customer continued on, looking for another propane filler. Eventually he found a filler willing to purge and fill his new tank. However, the filler was not experienced at this and did not properly purge the new tank before filling it.

The next morning, the man arrived back at our dealership complaining that the new furnace he had purchased wasn’t working. The fan would come on but it would not ignite or produce any heat. After having a look our technician determined that the tank had not been purged and as a result no propane was traveling through the lines to the appliance.

To avoid this problem it is essential that any new propane tank/cylinder or tank/cylinder that is revalved be properly purged BEFORE it is filled with propane.  This procedure removes air and moisture from the tank/cylinder.  Without doing so, you can have erratic or poor operation of all your appliances.  The worst case scenario being that the moisture would in fact ruin all the propane valves and regulators in your RV.

Be sure to use a reputable propane dealer in your area.

RV Anti-Freeze

RV Anti-freeze – Not All Antifreezes Are Created Equal

RV/Marine non-toxic antifreeze is probably the most misunderstood commodity in our industry today.  There are currently three different varieties on the market at three very different prices.

Ethanol (alcohol) based:  This type of antifreeze is most readily available in hardware stores and most RV shops it sells for approximately $3.00 Canadian a jug.  However, this product is also extremely flammable and not to used around any sort of pilot flames or cigarettes.  As well, this product has been known to taint certain RV plumbing systems and is only to be used with Quest or Pex plumbing lines.  Furthermore, because this product is made from alcohol it works to dry out all the rubber seals readily found in your faucets and toilet.  As a result we do not recommend or sell this product.

Propylene Glycol based:  This product is only available at your local RV shop (and not every RV shop for that matter).  It sells for approximately $6.00 Canadian a jug.  Like the ethanol antifreeze, this product is non-toxic and safe for all RV plumbing.  However, propylene glycol does not have the same fire safety warnings, nor the risk of tainting your RV plumbing system.  Furthermore, propylene glycol is a lubricant and will actually work to extend the life of the seals in your faucets and toilets, unlike the ethanol based products.  This is the only product we use on our own RVs and the only product we sell in our parts store.

Propylene/Ethanol Blend:  Again this product is non-toxic and completely safe for RV plumbing systems.  It will cost more than $3.00 and less than $6.00 Canadian a jug.  This may seem like a good idea, however, it is unknown how much ethanol is required to taint RV plumbing lines and dry out plumbing seals.  For that reason we do not recommend this product.

Know What you are buying!

Permanent Sewar Systems

For all of you who camp in seasonal campgrounds (and are fortunate enough to have an on-site sewer system), we have a few pointers for you:

1. It is often tempting to connect your trailer sewer system directly to the ground using solid pipe.  (No more messy, flimsy sewer hose to deal with.)  Although this may seem like a simple hassle free solution it can often cause long-term problems!

Consider this, you are connecting a solid piece of pipe to the hard ground.  In the winter when the ground freezes, that solid piece of pipe has nowhere to go.  This pressure can cause your solid sewer pipe to crack, or worse still, cause pieces of your trailers sewer system to break or crack (ie the slide valves and/or waste tanks).  In the end you can be left with a very big mess.  All it takes to avoid this is about 1 foot of flexible sewer hose between your trailer and the ground.  Or better yet, a product call “soft bore hose” (a length of hard pipe, that has a thick flexible rubber piece at both ends) that is designed for just this situation.

2. Another common issue from campers on a sewer system is the sink. You know that terrible, nauseating odor that emerges from your bathroom.  From what we have observed, this problem is most common in campers that chose to keep their slide valves open all the time, or those who dump their tanks too often.  Because so little liquid is being added to the tank at one time, a build-up begins to form on the inside of the tank.  As this build-up increases, so does the odor inside your trailer.

Solution: Close that slide valve.  By allowing your waste tanks to fill with liquid when you dump them, you get lots of water pressure, meaning your tanks are virtually swept clean.  For those of you who like to keep your tanks near empty all of the time, try adding water to your tanks (ie dump water into your toilet) before you empty them. There are lots of specialized tools available for doing this, but a garden hose works fine.

3. Remember that a good toilet chemical is an important part of maintaining your sewer system.  We find chemicals that work best have both a waste digesting component and a deodorizing component.  The waste digester helps to keep your tank clean by breaking down solid waste, while the deodorant covers up that smell.  You should add toilet chemical to your tank (ie pour it down your toilet) after you empty it.  We recommend ODØRLØS holding tank treatment (available in both dry and liquid).


Leaky RVs

Is a Leaky RV Getting You Down?

Let us introduce you to this fabulous service.

Water leaks caused by rain are one of the most difficult and costly problems for RV owners today.  A leaking RV may cause unsightly stains, foul odors and tremendous structural damage to the unit.  By the time most owners realize there is a problem, damage to the RV may be extreme, not to mention expensive to repair.  Furthermore, rain leaks are not always easy to locate and may therefore persist even after repeated attempts to seal an offending area.

We are excited to offer a service to help alleviate this problem.  The SEALTECH 430R is an efficient and accurate way to check for leaks.  This machine makes use of a very simple fact: air flowing through an opening covered with a soapy water solution produces a bubble precisely at the opening.

Sealtech1

The system draws outside air into the RV through the roof vent, where it is dispersed, creating positive interior pressure.  This pressure difference causes air to flow outward through any outer skin faults.  The application of a soapy water solution to suspicious areas of the outer skin results in a bubbles exactly over each fault.

Sealtech_Machine2

We can check your RV for leaks on our premises and give you a detailed report of problem areas. You can chose to repair the RV yourself or allow us to do it for you.

Come in today and find out more about having your RV Sealteche. No Bubbles! No Troubles!


Awning Care

Most RV’s now come equipped with roll-up awnings. These awnings are a wonderful addition to any RV as they provide campers with a spot out of the sun and drizzle to enjoy the fresh air. However, many campers misinterpret how to operate these accessories properly. Roll-up awnings are built to be quick, convenient and easy to operate and therefore are intended to be ROLLED UP!! In fact, most roll-up awnings can be rolled up in a matter of seconds (with a little bit of practice). However, it is too often the case that awnings are damaged or destroyed by wind and rain when campers are away from their RV’s or asleep at night. Although there are many products on the market to help protect awnings from wind damage, the best protection is to keep the awning rolled up if the weather report calls for high winds or storms or if you expect to be away from your RV of any extended length of time. This practice can save you hundreds of dollars in repair costs or insurance deductibles and the inconvenience of being without your awning or even your RV while it is being repaired.

Here’s a list of Products that are designed to protect your awning:

Center Rafters, Bar-to-Ground Supports and Cradles:

These three products are designed by most awning manufactures to help support awnings that are larger than 16′ and are normally awning specific.

The Cradle:

acc_cradleThe Cradle acts as a support for the awning while it is rolled up. Awnings over 16′ tend to become bowed in the center as a result of the weight of the roller assembly and the downward pull of gravity. The cradle will gently hold the awning in the center and help keep it straight over time. They are also very important for campers who take their RV on the road. Roads conditions tend to take their toll on awnings, causing them to bounce and develop a bow in the middle.

Center Rafters and Bar-To-Ground Supports:

The center rafter is a type of pole that extends from the awning rail out to the roller assembly when the awning is rolled out. While the Bar-to-Ground Support goes from the roller assembly back in to the RV or down to the ground depending on your personal preference and camping conditions. These supports help strengthen the awning hardware and help to prevent bowing of the roller tube and fabric sagging. In fact, if your awning is larger that 19′ it is recommended that you install 2 center rafters with Bar-to-Ground Supports.

optima rafter
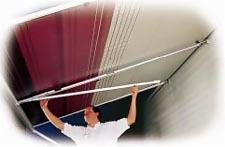
Please  Note: Although many RVs come from the manufacturers with awnings larger than 16′ already installed, rarely do they come with a Center Rafter/Bar-to-Ground combination. This does not mean your awning would not benefit from this system and we recommend installing the A&E Optima system. This system contains a Cradle, Center Rafter and Bar-to-Ground Support that is nice to look at and easy to operate.

Awning Straps (often called Hurricane Straps):

These products consist of a long nylon cord, two tent pegs and a spring. The nylon cord stretches over the awning just above the roller tube and then is anchored into the ground by the tent pegs, and the spring does offer a little bit of give when the winds pick up. This product does offer additional anchorage and support for you awning hardware. However, it should not encourage campers to keep their awnings rolled out in inclement weather.

Awning De-Flappers:

Deflappers
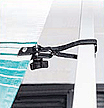
These are a relatively new product and are designed to help cut down on awning noise caused by fabric vibrations. They attach to the inner arm of your awning and then to the fabric. They help to hold the fabric in place in windy weather, and may ward off fabric tearing. These products have become so popular that awning manufactures like Carefree of Colorado are including them on some of their new roll-up awnings (The Carefree Fiesta and Spirit).

Please Note: Although the above products may help to protect your awning in the wind, they should not be used as a substitute to rolling your awning up. We can’t stress this point enough … If the weather is bad, or you are not going to be at your RV for an extended length of time, please put your awning in (even if you have an awning strap).

Awning Cleaners:

Keeping your awning clean may seem like a purely cosmetic activity. Although having a clean awning does make your RV look nice, it can also serve to extend the life of your awning fabric. Most awnings are now manufactured with a protective UV layer, which helps extend the life of your awning fabric by repelling the UV rays that dry out the vinyl fabric. Awning fabrics that becomes dry and brittle are more likely to tear. You can help extend the life of your awning fabric by keeping your awning clean and using a product specially designed for vinyl fabrics. These cleaners and protectors help keep vinyl fabric soft and pliable.